Wheeler Reef:
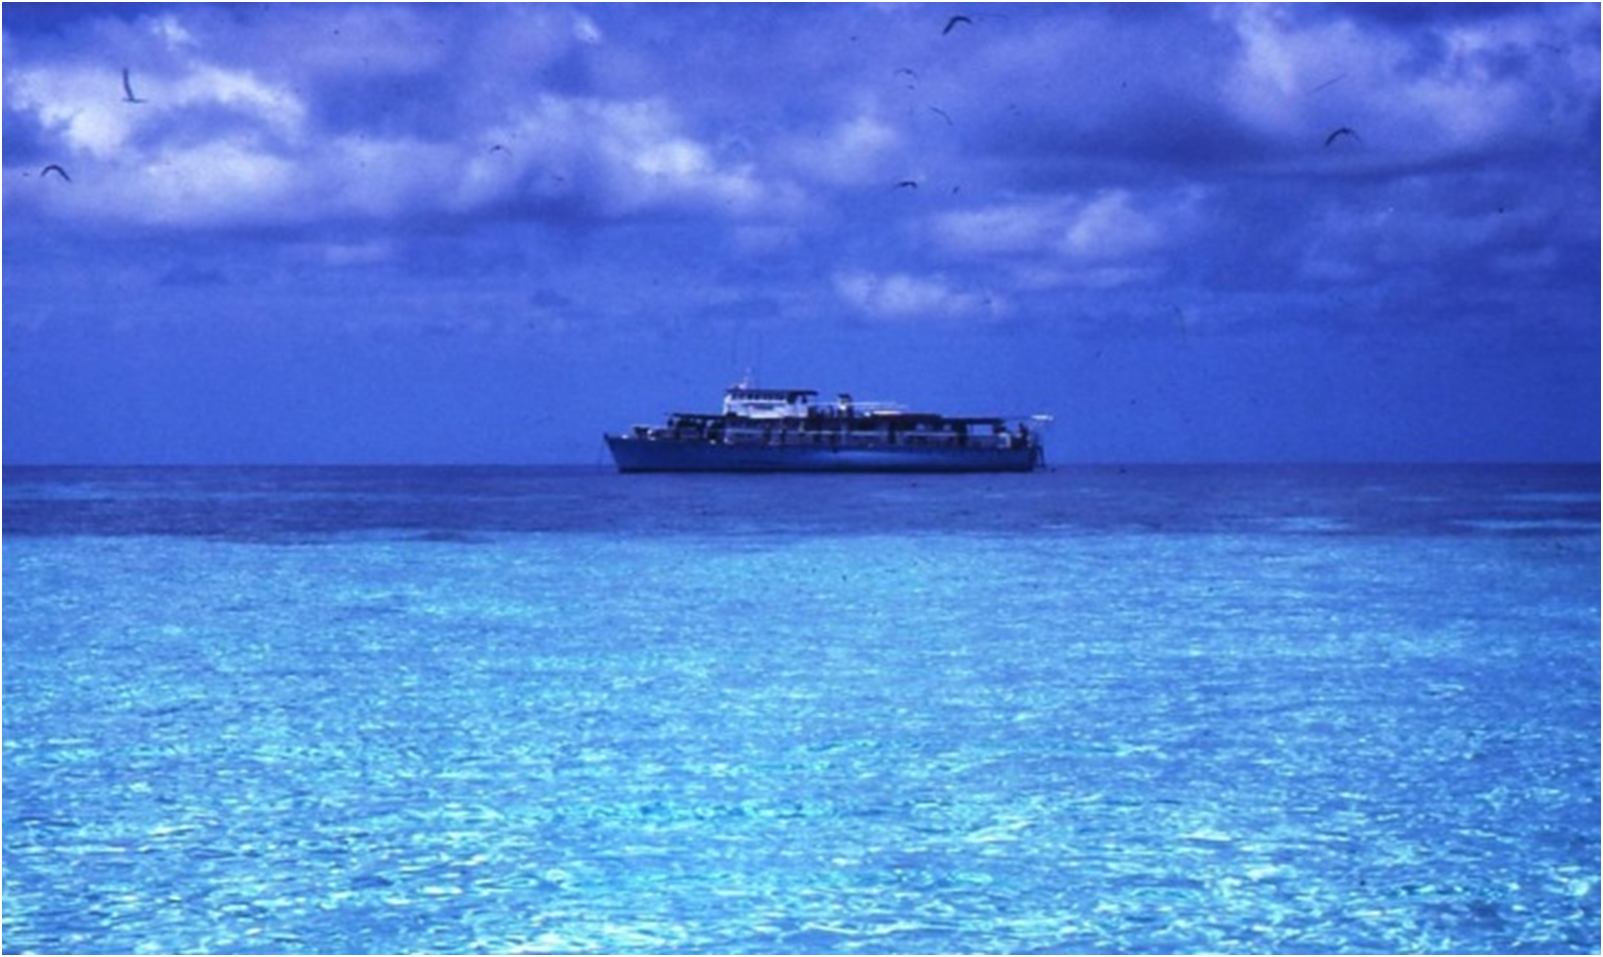
Wheeler Reef is possibly the best-known reef within the Townsville region of the GBR, and nearly always features on the itineraries of commercial operators. It is a small reef with a picturesque lagoon, and has characteristics to please a wide range of dive tastes and experience levels. Wheeler is located around 48 N mi from Townsville, 6 N mi south of Centipede Reef, and 12 N mi west of Davies Reef. It suffered significant damage during TC Yasi in February 2011, but has made a strong recovery, and has no doubt benefitted from its many years of protected status (even well before the introduction of reef zoning in 2003).
Wheeler Reef also offers some intriguing recent history, through its role in the loss of the dive vessel Reef Princess; although this deserves its own dedicated story, through the narrative of those involved.
There are many internet dive destination listings for Wheeler Reef, and it is also well described by local operators, so rather than adding to ground already covered, the following content has been assembled exclusively from NQUEC diver logbook entries, which hopefully provides some interesting information and advice from our more memorable dives at this reef. As with all dive site profiles, the content can slowly deviate away from current site conditions and lay-out, due to a range of factors, especially storm damage.
Wheeler Reef has a public mooring in around 13m of water. From the mooring you can explore three general areas; coral bombies in deeper water, ‘mid-ground’ around the mooring, and the reef edge.
From the mooring (heading away from the reef edge), the sandy bottom drops gradually to around 25m. There are many detached coral bombies worth exploring here, especially where you find a pair spaced fairly close together, as the passage between the two often holds heaps of fish life. Black and white tip reef sharks often circle around the base of these deeper bombies and we’ve also spotted large pelagic fish here such as trevally and mackerel. Light penetration around the deeper bombies can be problematic for photographers though, and a red lens filter is useful to help restore the natural colours.
The ‘mid-ground’ has a sandy bottom in around 10m to 15m of water, and contains lots of smaller low-lying coral features. This area is used frequently for dive training, probably because the bottom lacks large features, allowing instructors easy observation of their students, but it’s still worth dedicating a couple of your dives just to this area though, as it’s small coral out-crops often form ‘mini-habitats’. One such habitat close to the mooring looks like a large football shaped rock sitting upright, with a central crack large enough for a diver to swim through. Its shape is distinguishable only momentarily after ‘shooing’ the perpetual cloud of glass fish, damsel fish, and anthias out of the way, and we usually stop here for a while just to marvel at how fat and content the rock’s resident coral trout seem to be!
We’ve also made some notable finds around the mooring, such as a school of razorfish all hanging inverted and perfectly motionless within a small staghorn coral, decorator crabs preening their camouflage, and a mantis shrimp living in a hole near the base of a lone vertical arm of coral which was shaped like a soft drink bottle, (apparently they use a piece of coral to practice their boxing style ambush skills, creating coral arms with unusual shapes in the process).
You can swim directly up to the reef edge, or you can visit it as part of a large circuit dive, beginning and ending at the mooring. If you choose the later, then begin by identifying the left-hand and right hand points of the reef edge. Shoot a compass bearing to roughly the centre of the two points. (These points may not be the true extremes of the reef edge, but for the purpose of this description, they will be referred to as the left and right points).
Once you’ve commenced your dive on your bearing to the approximate centre of the reef edge, on your slight left at about 50m to 75m from the mooring, you will find a large coral bombie. Head around the inside of this first bombie in an anti-clockwise direction, and you’ll notice the first bombie conceals a second one from view, with a steep sandy slope or ‘ramp’ separating the two bombies. Spend some time around the base of the ramp, as it seems to be a well-used route for fish and turtles, and the sand here often holds dozens (probably hundreds) of garden eels.
Head down the ramp and around the second bombie in a clockwise direction. Depth here bottoms out at around 25m, and be prepared for some current. The attraction to taking this path for me, is the potential to see large pelagics and reef sharks around the back of these two bombies, plus prolific table-quality fish such as coral trout, spangled emperor, grassy sweetlips, and many varieties of small to mid-size cod species. If you find your air consumption increases markedly here with depth and current, I’ve been able to slow my air use by ascending to about 15m and remaining close to the bombie, which still enables me to watch all the action below.
As you round the end of the second bombie, the bottom slowly comes up to meet a large open sandy patch in about 10m, which separates the bombies from the reef edge. You can regain your original heading by adding a correction of about 60 degrees to it (as you would have deviated by at least 30 degrees through turning slight left towards the first bombie). If you track too far left, you’ll hit the reef edge where the dominant terrain is staghorn coral, which indicates you’re close to the left point. Unless you are really good on your gas, you probably won’t be able to cover the full frontage of the reef edge starting out from the left point, but you should get a good introduction to it, before it’s time to head away from the wall and back to the mooring.
There are loads of interesting structures to explore along the reef edge, but my favourite section starts at the centre and extends to the right point. You’ll find many opportunities to explore over-hangs, swim-throughs, and gutters here (some leading all the way through into the lagoon), and these features also make for excellent snorkelling. On many dives along this section I’ve been followed along by schooling fish such as stripey snapper, Moses perch, yellowtail barracuda, and bump-head parrot fish, which are often found munching on the coral like grazing cattle. I recommend giving them a little space though, because on one dive I positioned myself right in their line of march with my trusty little camera at the ready, only to be covered in clouds of digested coral for my efforts!
You can tell when you have swum all the way to the right point, because the shallow wall tapers off to a large open sandy-bottom ‘clearing’, which under the right conditions becomes a massive cleaning station. On one particular dive, my buddy and I witnessed flowery cod, Maori wrasse, sweet lips, dozens of coral trout, and even a free-swimming moray eel all getting serviced by cleaner wrasse.
If you elect not to do a large circuit dive and prefer to swim directly up to the reef edge, then make a note of the point where you reach the wall, as this can be used as your exit point on a back-bearing to the mooring. If you don’t have a unique looking feature close by, then a cylume stick on a string or an anchored SMB can be used as a navigation aid. Whatever you use, don’t forget it needs to be immobile. On one Wheeler Reef dive, a very intrepid NQUEC diver carefully collected a bunch of nearby sea cucumbers and arranged them into the shape of an arrow pointing back to the mooring. The only error in his plan was that he forgot to ask the sea cucumbers not to wander off for at least 30 minutes!
Lodestone Reef:
Lodestone Reef is a Habitat Protected reef (dark blue zone) which lies around 23 N mi west of Wheeler Reef, and is reasonably close to Keeper (8 N mi) and Helix Reefs (16 N mi). Lodestone suffered damage from TC Yasi in 2011, and you will occasionally notice lost fishing tackle here, but it continues to be favoured by Townsville operators, who often refer to it as an ‘all-rounder’ reef. It has brilliantly colourful coral gardens for snorkellers, as well as interesting structures for divers.
NQUEC began visiting this area on weekend live-aboard trips in late 2011 using an ex-Townsville Port Authority survey vessel, owned at the time by a club member, (also covered under the SS Yongala content). We chose this reef based on advice from a local operator who explained that as it is within easy reach of Keeper and Helix Reefs (both highly regarded sites), we could potentially visit all three in a weekend. As it worked out, we rarely made it to all three, because we found the diving at Lodestone and Helix so good.
On our first visit to Lodestone, we anchored up over sand close to the central lagoon and used a small inflatable tender to drop off and retrieve divers. In the distance on the opposite side of the reef we could see one of the Townsville based day-trip dive boats. Our initial dives here were fairly hard work, because we were skirting the lagoon perimeter, often passing by breaks in the shallow reef wall which seemed to act as ‘drains’ for large volumes of water flowing into and out of the lagoon. On a few occasions towards the end of our dives, we moved up one of these drains to the other side of the reef wall, and explored the lagoon in visibility of up to 25m. We found loads of interesting marine life here such as nudibranchs, flat-worms, leopard sharks, white tip reef sharks, and turtles.
On subsequent Lodestone Reef dives, we moved around to the outside or seaward side of the reef where we’d previously noticed the day-trip dive boat. Here we found very different terrain, with coral canyons and detached bombies around the 15m to 18m mark. On most of my dives along the seaward side of Lodestone Reef, I’ve noted a lack of big table-quality reef fish such as trout, snapper, and emperor species, but in my opinion, this is more than made up for by both the interesting structure, and by the amount of small-critter action; such as anemones. On one particular dive, we made our way back towards the boat along a series of gutters sloping away from the reef, which had partially formed ceilings where corals on each side of the gutter almost met in the middle.
Helix Reef:
Helix Reef is a Marine National Park reef (green zone) of similar size to Wheeler. When NQUEC was planning trips here in 2011, we had heard Helix seemed to attract fish species not frequently seen on the inner reefs, such as true clown anemone fish, ribbon eels, and oriental sweetlips. So the potential to spot some rare critters, along with its close proximity to Lodestone and Keeper made it a must-visit for us, and we had several memorable dives here.
Helix has quite a different ‘look-and-feel’ when compared to Lodestone and Keeper. Lodestone has about 3 km of reef frontage with an idyllic tidal lagoon among beautiful turquoise blue water, whereas Helix has just over 1 km of frontage, and appears more like an outer reef surrounded by deeper water of a much darker colour.
Its surrounding steep gradient can make anchoring around Helix a tricky proposition, and our first few visits required a fair amount of trial-and-error before we found sandy sections able to hold us in spots we felt gave good diving access. We eventually found the approximate centre of the western (inside) edge of the reef offers reliable anchorage and excellent diving, both in terms of structure and fish life.
Davies Reef:
Davies Reef is a Conservation Park reef (yellow zone) which lies around 5 N mi due east of Wheeler Reef. Davies is used by AIMS as a weather and oceanographic observation site, with data collected by an Automated Weather Station (AWS); http://weather.aims.gov.au/#/station/4. The AWS is mounted on a multi-story platform which is quite recognisable from a distance.
Davies has a little over 6 km of reef frontage and my diving here has been predominately along its western edge. The key observation I would make about Davies; is its impressive wall diving. We’ve usually approached Davies towards its southern end where the reef edge skirts around in a westerly direction. This section has beautiful walls overflowing with soft corals in about 10m to 15m of water, and during my visits I found the visibility so good along these walls that it was easy to inadvertently descend towards 30m, if you moved away from the wall to explore the reef slopes.
I also highly recommend exploring the detached coral bombies and pinnacles surrounding the AWS. We found bombies down to 18m in this area teeming with fish life, especially where a gap exists between two structures facing a current flow. We found one such gap between two big bombies filled with clouds of sweetlips and jacks, and the water in the flow felt noticeably warmer than the surrounding water.
Bait Reef:
Located within the Whitsunday GBR region, Bait Reef is a Marine National Park reef (green zone) approximately 32 km northeast of Hayman Island, (refer to Zoning Map Number 10 at http://www.gbrmpa.gov.au/visit-the-reef/zoning). Bait Reef spans just over 3 km across its widest point and sits around 11.5 km west of Hardy Reef (which is probably the best nearby reference point, as the iconic heart shaped reef lies within the western edge of Hardy Reef).
The following dive site profile was developed from two club-chartered weekend live-aboard trips to the area. Whilst this is not current information, we felt the standout feature of Bait Reef is its intricate structures; which should still remain, even though GBR corals are changing with increasing environmental pressures.
At the start of our first charter, our skipper took us to Manta Ray Bay on the northern end (or seaward face) of Hook Island for a check-out dive in shallow water. Manta Ray Bay is the next bay northeast from Luncheon Bay, and is visited regularly by day-trip dive boats, sail cruises, and party charters. We maintained a fairly consistent 15m, and even though visibility was around the 5m mark, we still found some excellent fringing reef, plus small reef sharks, turtles, painted crayfish, anemones, coral trout, and feathered sea stars.
Our first dive at Bait Reef was at a site known locally as ‘the Steps’, which aptly describes its appearance as a series of giant flat-topped bombies arranged in a line, with each ‘step’ becoming gradually deeper as you move away from the reef edge. Even on my very first dive here, I found the structure to be as good, if not better, than some of the very best of Wheeler and Helix Reefs. We were guided around these giant bombies and shown swim-throughs and caves in about 25m of water with visibility up to around 25m.
Our next dive was at ‘the Cluster’ which is a collection of four large bombies arranged into the rough shape of a cross at one end of the Steps. We did this as a night dive and it was pretty obvious the spot is used by turtles as a resting ground, so we tried to give them some peace and quiet, until we rounded a corner and stumbled upon a school of very rowdy barracuda and giant trevally. The dive quickly became somewhat chaotic as both predatory fish were using our lights to identify and attack small fish, and they had absolutely no fear of divers. At one point I thought my buddy was attempting to hastily remove his gear, as a fully grown GT had chased a small fish towards him with so much gusto that it had completely wedged itself between his BCD and wetsuit!
We did one more dive at ‘the Steps’ the following morning, only this time incorporating a visit to a structure known as ‘the Chimney’. We started the dive by swimming about 75m along a trench cut into the reef, with its base at around 20m. The trench is roughly the width of a dual lane road, and fish seem to use it as a ‘high-way’ between the shallows of the reef flat and the deeper water beyond the reef wall. The trench finishes at the inside face of the reef wall just under a large circular shaped opening which leads to a tunnel. The tunnel travels about 20m through the reef wall and exits to open water. On the outside, the reef wall slopes away quite dramatically, so we followed it along at about 15m for a short time before coming back up and over it, and turning towards the trench which we followed back to the boat. This site offers a great combination of dive types; from sink-hole diving and wall diving, to shallow drift-diving over reef flats.
NQUEC returned to these same Bait Reef sites on our second charter, but with the memorable addition of a site referred to as ‘the Cathedral’. We started this dive making our way single-file along a swim-through which leads into a large sand-bottomed ‘clearing’. We used this spot as a waiting area, because the passage up to and into the Cathedral is only large enough for the guide to take one diver at a time. Looking down the passage towards the Cathedral from the waiting area, all you can see is a shadow in the shape of a large inverted ‘V’, but once you approach this shadow your eyes begin to adjust to the light. From this point the passage leads up and into the Cathedral which is a partially closed chamber large enough to accommodate four divers. We assumed its name comes from the eerie looking fingers of light which come down into the chamber from above.
Loss of the MV Reef Princess at Wheeler Reef on Sunday 4th October 1981
The Reef Princess was a privately owned 115ft (30m) foot timber-hulled vessel, which was often chartered by a Townsville based dive company. It had 38 passengers and crew onboard for what would become its final weekend live-aboard trip.
On Saturday 3rd October 1981, a dead-flat ocean coupled with blue skies made for a great day of diving at Wheeler Reef, around 75 km north-east of Townsville. Late that afternoon, the vessel was repositioned for the night dive to an area in among a group of bommies close to a small sand cay. Conditions at the night dive location were good, and the crew decided to anchor here for the night. At around midnight, the calm conditions changed dramatically to 45 knot winds and torrential rain. This fierce weather pushed the boat onto one of the nearby bommies. Battling the conditions, the crew attempted to move the boat out to open water, but at around 2:30 am; inadvertently reversed the Reef Princess up and onto a bommie. Large waves whipped up by the storm started breaking up the boat as everyone gathered in the dining room to await instructions from the crew.
The passengers learnt that the stern was stuck fast above the water line, and the sinking bow was quickly filling with water which was lifting floor boards in the below deck cabins and corridors. The crew then gave the “abandon ship” order, with everyone directed to prepare by donning their wetsuits. Passengers waited patiently to be ferried across to the nearby small sand cay on a flat-bottom coral viewing boat. The 38 divers and crew calmly relocated to the sand cay, which was being blasted by 45 knot winds and getting smaller and smaller as the tide rose. An emergency call was transmitted and was fortuitously received by the research boat RV Lady Basten, which was sheltering at another reef not far away. On Sunday morning, the Lady Basten rescued the group and transferred them safely back to Townsville in very wild seas.
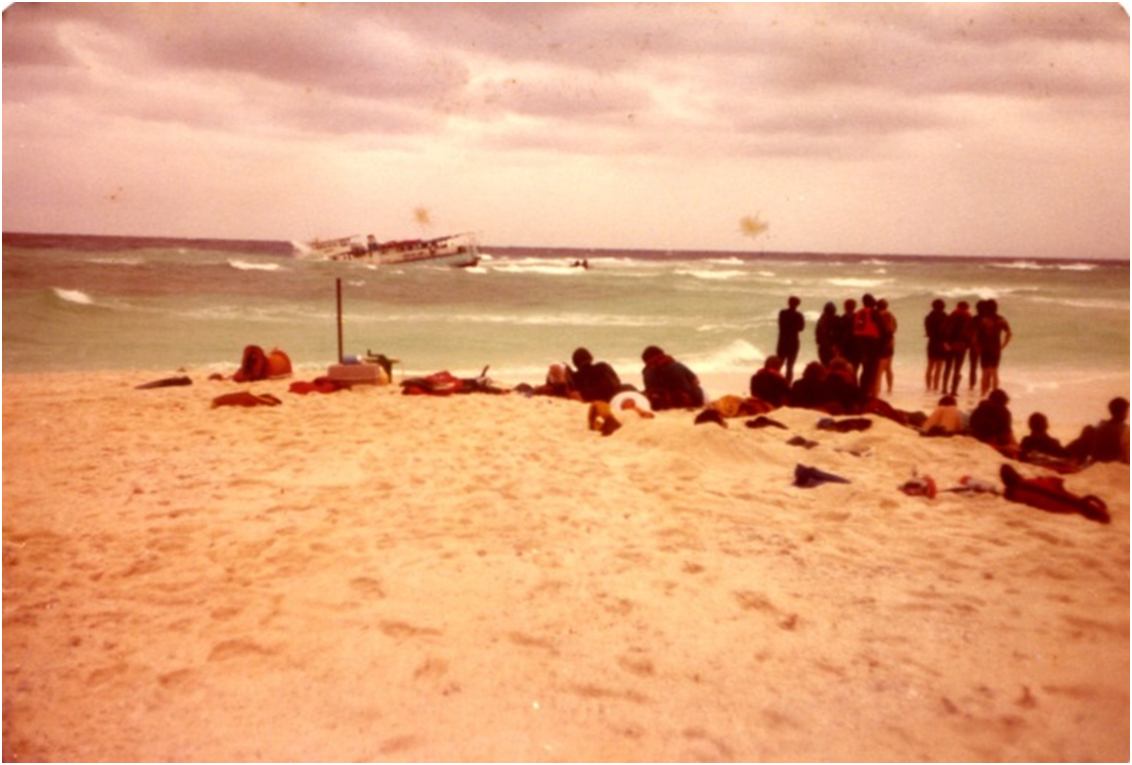
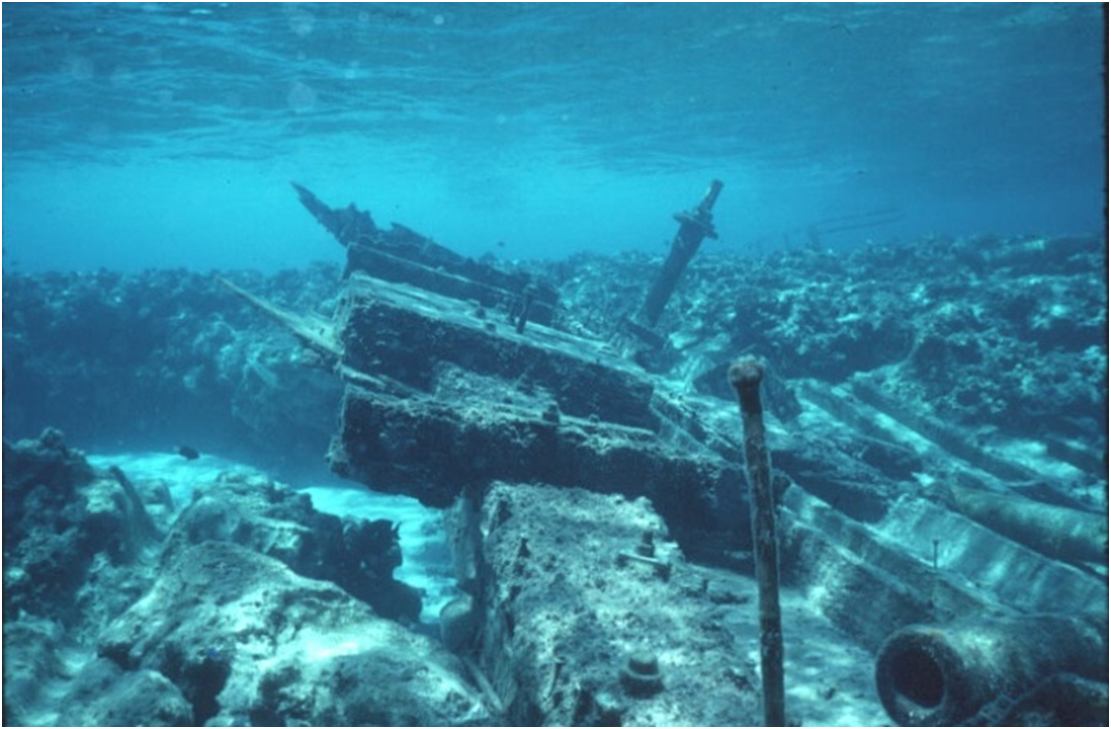
Several days after the storm passed, the diving equipment and other items of value were recovered, and the stricken charter boat was left to settle-in to her final location. Because of its timber construction, the Reef Princess was quickly broken up and scattered across the shallow reef floor, leaving very little to discern it as a vessel.
Former club President and lifetime NQUEC member Ken Garnett was a diver onboard the Reef Princess when it sunk. He has very kindly penned this factual account of the event and even supplied the photos which he took during the ordeal.